You’ve just picked up your first guitar and you’re eager to learn the basics. You may have heard that there are certain chords that every beginner should start with and the basic answer to that is “yes”. Learning these simple chords will not only give you a solid foundation for playing countless songs, but they will also help you develop finger strength and dexterity.
These essential chords, the C chord, G chord, D chord, A chord, and E chord are commonly referred to as the ‘first chords’ for beginners.

beginner guitar chords
So let’s dive into each of these first chords and begin your journey towards mastering them.
Key Takeaways
- The first chords to learn on guitar are C, G, D, A, and E.
- Proper finger placement and technique are crucial when playing chords.
- Practicing with a metronome can help with accuracy and smooth transitions between chords.
- Consistent practice with proper technique can lead to mastering more complex songs in the future.
Introduction to Learning the First Chords
You’re gonna love learning the first chords on guitar. There is nothing like mastering these to motivate you and let you know you are well on your way.
Learning these will allow you to play popular songs that use simple chord progressions. You’ll also develop finger strength and dexterity as you practice switching between chords, which you will need and will help you as you expand your skills.
However, common mistakes beginners make when learning chords can be frustrating and hinder progress. One mistake is not placing fingers on the correct strings or frets, causing a buzzing or muffled sound. Another mistake is not pressing down hard enough on the strings, resulting in muted notes. These issues can be easily corrected by paying attention to hand placement and practicing proper technique.
To avoid and reduce mistakes and ensure success while learning the first chords, take it slow and focus on accuracy over speed. Practice each chord individually before attempting to switch between them.
Consistent practice will help build muscle memory and eventually make playing chords feel natural. With patience and dedication, you’ll soon be strumming along to your favorite songs!
References to Strings and Fingers When Playing Chords
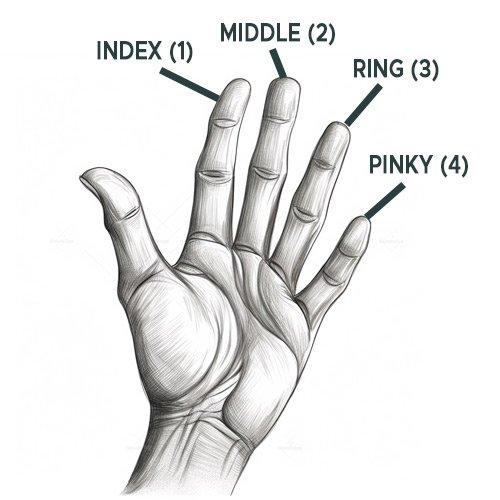
In order to understand which fingers are placed on the proper frets, here is a chart that describes the finger name and number system that we reference in this post.
We will also reference the string by both number and the note in standard tuning (EADGBE). Here is an image that identifies the string.
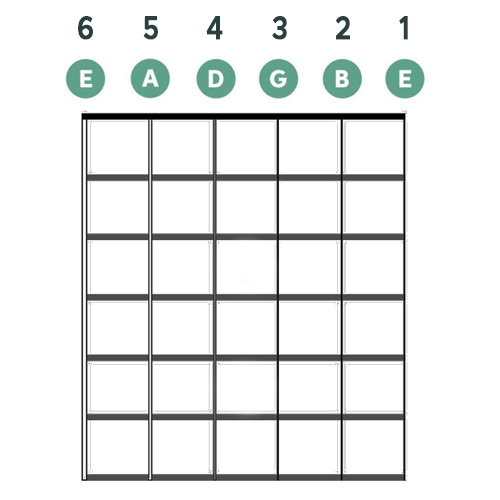
Lastly, when references frets, the first fret in a vertical image is the one on top and goes down from that point. While holding the guitar, the 1st fret is the fret closest to the nut.
The C Chord
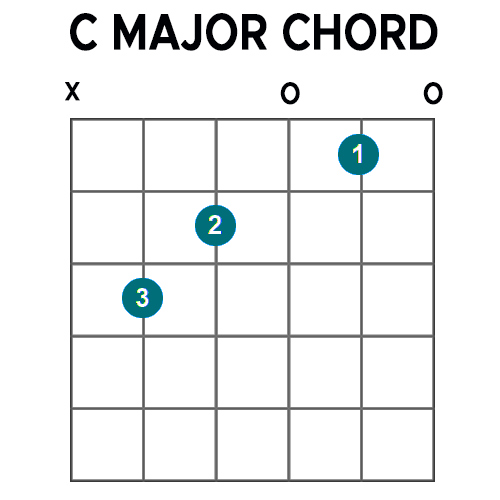
The C chord is a must-have for any aspiring guitarist. In fact, it isn’t uncommon for beginners often learn this chord first.
To play the C chord:
- Place your 1st (index) finger on the 1st fret of the 2nd (B) string
- Place your 2nd (middle) finger on the 2nd fret of the 4th (D) string
- Place your 3rd (ring) finger on the 3rd fret of the 5th (A) string
- Leave the 3rd (G) string open
- Leave the 1st (high E) string open.
Here are some tips to help you avoid common mistakes when playing the C chord:
- Make sure your fingers aren’t touching any adjacent strings. This can cause unwanted buzzing or muting.
- Check that each note in the chord rings out clearly. If not, adjust your finger placement until they do.
- Strum only from the A string down. This will ensure you’re hitting all of the notes in the chord.
Learning how to play guitar requires patience and practice, but mastering simple chords like C is a great way to start building your skills as a musician.
The G Chord
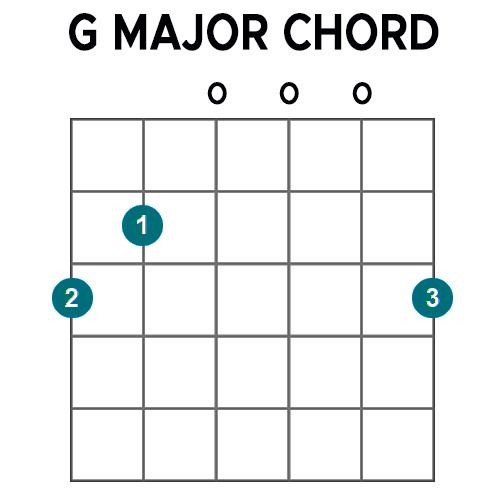
Let’s move on to the next essential chord for any guitarist – the G chord. The G chord is a great progression from C as these chords are commonly played together.
To play the G chord:
- Place your 1st (index) finger on the 2nd fret of the 5th (A) string
- Place your 2nd (middle) finger on the 3rd fret of the 6th (low E) string
- Place your 3rd (ring) finger on the 3rd fret of the 1st (high E) string
- The 4th, 3rd, and 2nd strings are all open
There are some variations in the G chord. You use your fourth finger (pinky) on the on the third fret of the 1st string (high E string) if you prefer. You can also add your third finger on the 3rd fret of the 2nd string (B string) to create a brighter sounding G chord.
The G chord is used in countless songs across different genres. One common song using this chord is ‘Sweet Home Alabama’ by Lynyrd Skynyrd. In this song, the intro riff consists of switching between D, Cadd9 and G chords. The G chord comes at the end of each line, strumming with an emphasis on every other beat.
G chord progressions can be found in many pop songs as well such as ‘Let It Be’ by The Beatles which uses C-G-Am-F for its chorus and ‘Someone Like You’ by Adele which uses Em-C-G-D throughout its verses.
By learning to transition smoothly between these chords, you’ll be able to play along with some of your favorite tunes in no time!
The D Chord
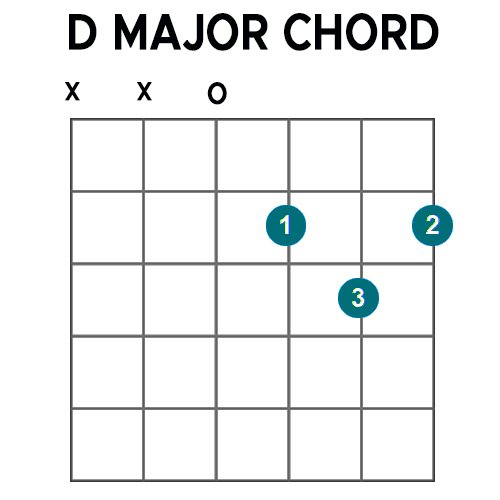
Get ready to add some variety to your chord repertoire with the D chord. The finger position for the D chord is relatively easy to learn.
To play the D chord:
- Place your 1st (index) finger on the 2nd fret of the 3rd (G) string
- Place your 2nd (middle) finger on the 2nd fret of the 1st (high E) string
- Pleace your 3rd (ring) finger on the 3rd fret of the 2nd (B) string
- Play the 4th string (D) open
- Do not play the 5th (A) or 6th (low E) strings
The D chord is commonly used in many popular songs and can be played alongside other basic chords such as G and A. This makes it an ideal choice for beginners who want to start learning simple chord progressions. With practice, you can switch between these chords seamlessly.
Don’t forget to give your fingers a rest if they get sore while practicing new chords. Take breaks when necessary, but make sure you come back refreshed and ready to play again.
Keep practicing until you feel comfortable playing this versatile chord smoothly in any song that requires it!
Quick Note on C, G, D chords
By learning the C, G and D chords, you now have one of the most commonly played sets of chords. These 3 chords just happen to go together extremely well when creating melodies. Here are a few famous songs that use these 3 chords in different progressions.
- You Shook Me All Night Long – AC/DC
- Brown Eyed Girl – Van Morrison
- Knockin on Heavens Door – Bob Dylan
- Leaving on a Jet Plane – John Denver
- Old Time Rock and Roll – Bob Seger
- Barbara Ann – The Beach Boys
- Over the Hills and Far Away – Led Zeppelin
- Bad Moon Rising – Creedance Clearwater Revival
- The Joker – Stevel Miller Band
- Ring of Fire – Johnny Cash
- The Gambler – Kenny Rodgers
The A Chord
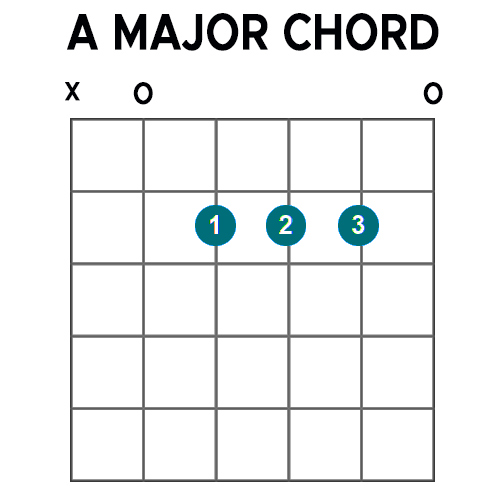
To play the A chord:
- Place your 1st (index) finger on the 2nd fret of the 4th (D) string
- Place your 2nd (middle) finger on the 2nd fret of the 3rd (G) string
- Place your 3rd (ring) finger on the 2nd fret of the 2nd (B) string
- Leave the 5th (A) string open
- Leave the 1st (high E) string open
The A chord will create a sound that will transport you to a sunny day at the beach. It is one of the most commonly used chords in guitar playing and is essential for any beginner to learn.
Finger positioning is crucial when playing this chord as it can affect how clear or muffled your sound will be. Your fingers will be squeezed in tight in a small area. To ensure proper finger positioning, make sure that each finger is placed behind its corresponding fret. Keep your fingers arched so that they don’t accidentally mute other strings.
One common mistake when playing this chord is accidentally muting or buzzing other strings with your fingers. Take note of which strings are supposed to be played and check if there are any unwanted noises coming from muted or buzzing strings.
There is a very common alternative way to play this chord, where you just bar the 2nd fret of the 2nd, 3rd and 4th strings. You mute the 1st (high E) string. This chord won’t sound a full but that may not matter. It often depends on the song. You will normally play a barred A chord when playing any kind of rock or distortion.
With practice, you’ll find that playing the A chord becomes easier over time. Use a metronome to help you get comfortable with changing between different chords smoothly and accurately. Don’t worry if it takes some time before you get things right – learning an instrument takes patience and dedication!
The E Chord
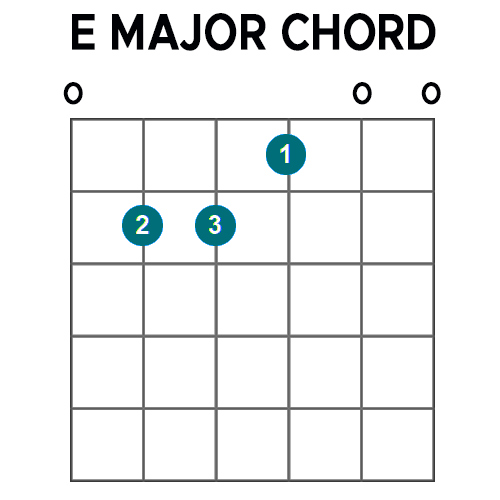
e major chord guitar
When learning the E chord on guitar, focus on finger placement and strumming techniques.
To play the E chord:
- Place your 1st finger on the 1st fret of the 3rd (G) string
- Place your 2nd finger on the 2nd fret of the 5th (A) string
- Place your 3rd finger on the 2nd fret of the 4th (D) string
- Leave the 6th (low E) string, the 2nd (B) string and 1st (high E) string open
In terms of strumming, try experimenting with different rhythms and patterns to find what works best for you.
Now, let’s cover a few other areas that can really help you succeed and ultimately step up your guitar chord playing game.
Finger Placement
Proper finger placement is crucial when learning the first chords on guitar, as it sets a foundation for good technique and makes playing smoother in the long run. Here are some tips to help you get started:
- Proper posture: Sit up straight with your feet flat on the ground, and keep your guitar at a comfortable angle.
- Hand positioning: Place your thumb behind the neck of the guitar, making sure it’s not too high or low, and use the tips of your fingers to press down on the strings.
- Avoid flat placement: Try not to place your fingers too flat. The base of your fingers and your palm will start touching other strings.
By following these guidelines for finger placement, you’ll be well on your way to mastering those first few chords and building a strong foundation for future playing.
Keep practicing consistently with proper technique, and soon enough you’ll be able to play even more complex songs with ease!
Strumming Techniques
To really bring a song to life, it’s important to master different strumming techniques such as the down-up strum.
The down-up strum is a basic technique that involves strumming downward with your pick and then upward in one fluid motion. They key to making this a smooth and clear sounding chord is to have a slight angle on your pick.
If your pick is 90 degree perpendicular or square to the strings its going to catch on those strings. When playing a downstroke the pick will be slightly pointed up. When playing an upstroke the pick is slightly pointed down.
As with everything, practice makes perfect. Find your favorite style and work hard at it, then you can incorporate others!
What’s Next
Consistency is key when it comes to improving your skills, so make sure to set aside regular practice time each week. This will help you build muscle memory and reinforce the chords you’ve already learned.
Another important step is finding a guitar mentor or teacher who can guide you along the way. They can offer personalized advice, answer questions, and provide feedback on your progress. Look for someone who has experience teaching beginners and who makes learning fun and engaging.
Remember, learning guitar is a process that takes time and dedication. Don’t get discouraged if you don’t see progress right away – keep practicing regularly and seeking out resources that can help you improve – it will be a snowball effect once it really kicks in.
With patience and persistence, you’ll be playing more complex songs before you know it!

